KB: 1071
How to decrypt SSL/TLS using Wireshark and SSLKEYLOGFILE environment variable on Firefox or Google Chrome using Wireshark?
Pre-Requisites
- Wireshark Software
- Firefox or Chrome browsers to access the web application
- SSL session keys
How to log the SSL session keys on windows
- Open the Environment Variables by right-clicking on This PC and selecting Properties.
- Click on Advanced system settings on the left.
- In the System Properties window, click on the Environment Variables button.
- Under System variables, click "New".
- In the Variable name field, enter
SSLKEYLOGFILE. - In the Variable value field, enter the path where you want the SSL keys to be saved, e.g.,
C:\path\to\sslkeys.log. - Select OK
- Start Firefox or Chrome
- Access the web application.Now, whenever you visit the application using SSL/TLS, the session keys will be logged to the specified file.
How to log the SSL session keys on Linux
-
Open a terminal
-
Create an empty file to store the SSLKEYLOGFILE environment variable
touch sslkeyfile.log -
Set the SSLKEYLOGFILE environment variable for your account by using the following command syntax:
export SSLKEYLOGFILE=/path/to/logfile/sslkeyfile.logFor example:
export SSLKEYLOGFILE=/home/test/sslkeyfile.log -
Start packet capture using an application such as Wireshark or tcpdump. For information about tcpdump refer to How to capture packet and tracethem through tcp dump utility?
-
Start Firefox or Chrome from the same terminal window that was used to set the environmental variable
For examplegoogle-chrome
Make sure to close all open browser windows, and always start the browser from the same command terminal, as the session variable is set only in that terminal.
- Access the web application. Now, whenever you visit the application using SSL/TLS, the session keys will be logged to the specified file.
How to decrypt SSL/TLS traffic using Wireshark with SSLKEYLOGFILE
Resources
Download the packet capture (.pcap)
Download the SSL KeyLog (.txt)
Steps
-
Load the Captured File
-
Capture the traffic using
tcpdumpbased on your requirements: from the client to the WAF machine or from the WAF machine to the backend server.From Client to WAF Machine
- SSH into the WAF machine.
- Start capturing packets using
tcpdump.
For example:
tcpdump -i any port 443 and host <Client IP> -w dump.pcapFrom WAF Machine to Server
- SSH into the server machine.
- Start capturing packets using
tcpdump.
For example:
tcpdump -i any port 443 and host <WAF IP> -w dump.pcap -
Open Wireshark.
NOTEEnsure that both the .pcap file and the SSL key file are present on the same machine where Wireshark will be used.
- Load the traffic
tcpdumpfile in .pcap format.
-
-
Configure the SSL/TLS Preferences
To upload captured TCP dump on wireshark.
- Go to File > Open
- Select your .pcap file and Select Open.
- This will show the list of captured packets.
Then we need to configure the TLS/SSL preference to decrypt the required file.
- Go to Edit > Preferences
- Expand the protocols list on the left side.
- Scroll down and select TLS or SSL (depending on your Wireshark version)
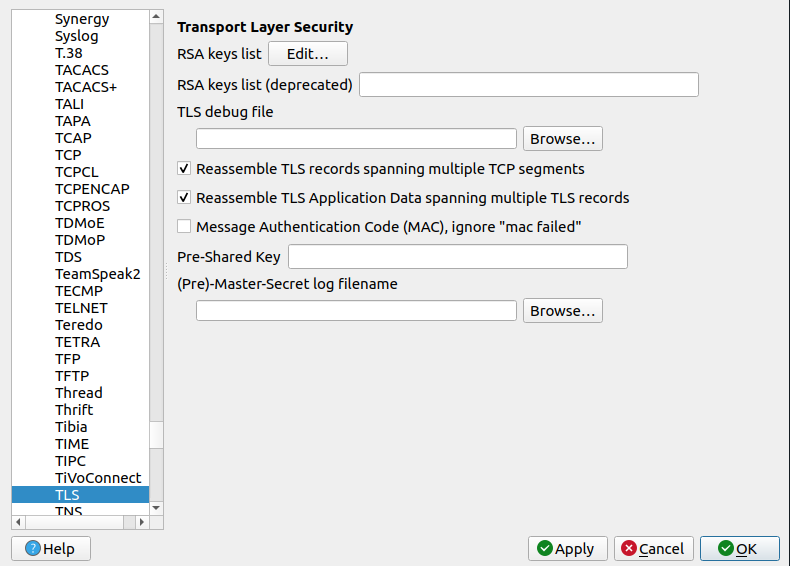
-
Set the Pre-Master Secret Log File
- In the Pre-Master-Secret log filename field, click Browse and select the sslkeys.log file that your browser has been writing to.
- Apply the settings by clicking OK.
-
View Decrypted Data
- Wireshark should now automatically decrypt the SSL/TLS traffic using the session keys from sslkeys.log
- You can inspect the decrypted packets, including HTTP requests and responses, directly in Wireshark